Vector Add with CUDA
Using the CUDA C language for general purpose computing on GPUs is well-suited to the vector addition problem, though there is a small amount of additional information you will need to make the code example clear. On GPU co-processors, there are many more cores available than on traditional multicore CPUs. Each of these cores can execute a thread of instructions indicated in the code. Unlike the threads and processes of OpenMP and MPI, CUDA adds extra layers of organization of the threads: programmers set up blocks containing a certain number of threads, and organize the blocks into a grid.
For the problem we originally posed, where we had 8 elements in an array, one possible organization we could define in CUDA would be 4 blocks of 2 threads each, like this:
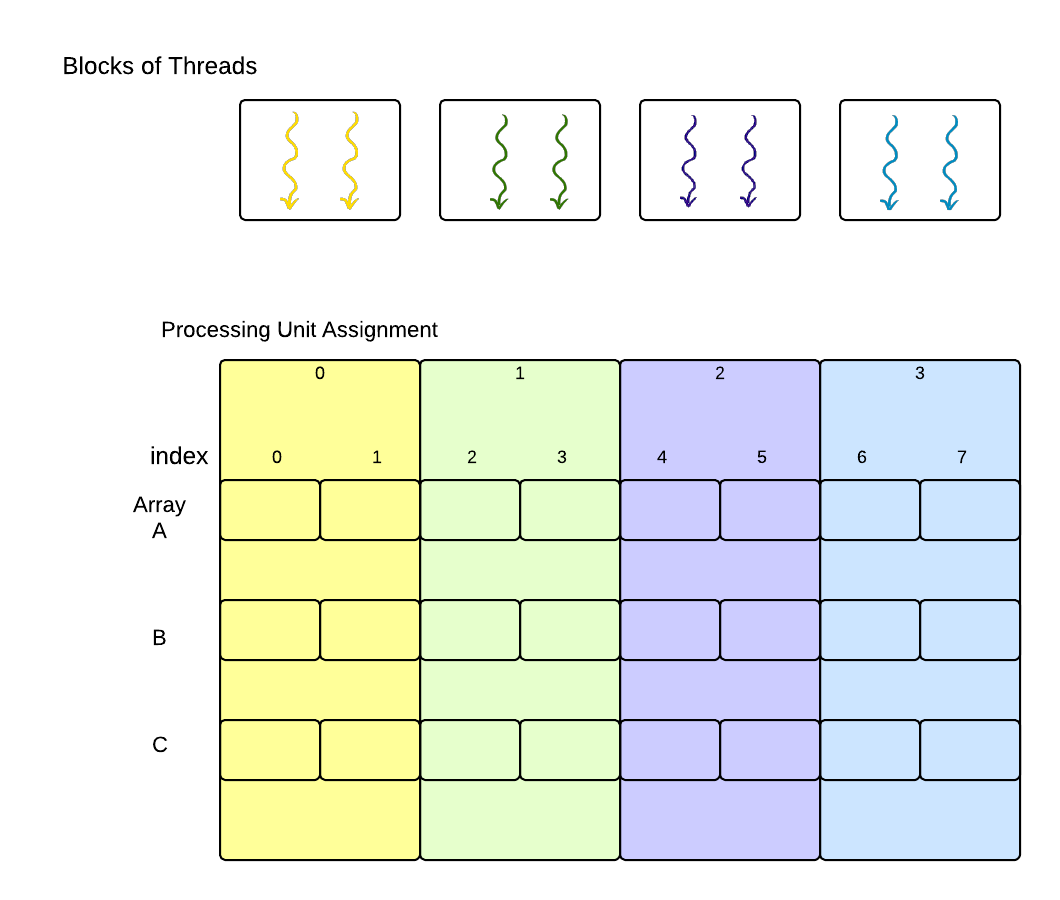
CUDA convention has been to depict treads as squiggly lines with arowheads, as shown above. In this case, the 4 blocks of threads that form the 1-dimensional grid become analogous to the processing units that we would assign to the portions of the array that would be run in parallel. In contrast to OpenMP and MPI, however, the individual threads within the blocks would each work on one data element of the array [1].
Determining the thread number
In all parallel programs that define one program that all threads will run, it is important to know which thread we are so that we can calculate what elements of the original array are assigned to us. We saw with the MPI program, we could determine what the ‘rank’ of the process was that was executing. In the OpenMP example in the previous section, thread number assignment to sections of the array in the for loop was implicit [2]. In CUDA programs, we always determine which thread is running and use that to determine what portion of data to work on. The mapping of work is up to the programmer.
In CUDA programs, we set up the number of blocks that form the grid and we define how many threads will be used in each block. Once these are set, we have access to variables supplied by the CUDA library that help us define just what thread is executing. The following diagram shows how three of the available variables, corresponding to the grid, blocks, and threads within the blocks would be assigned for our above example decomposition:
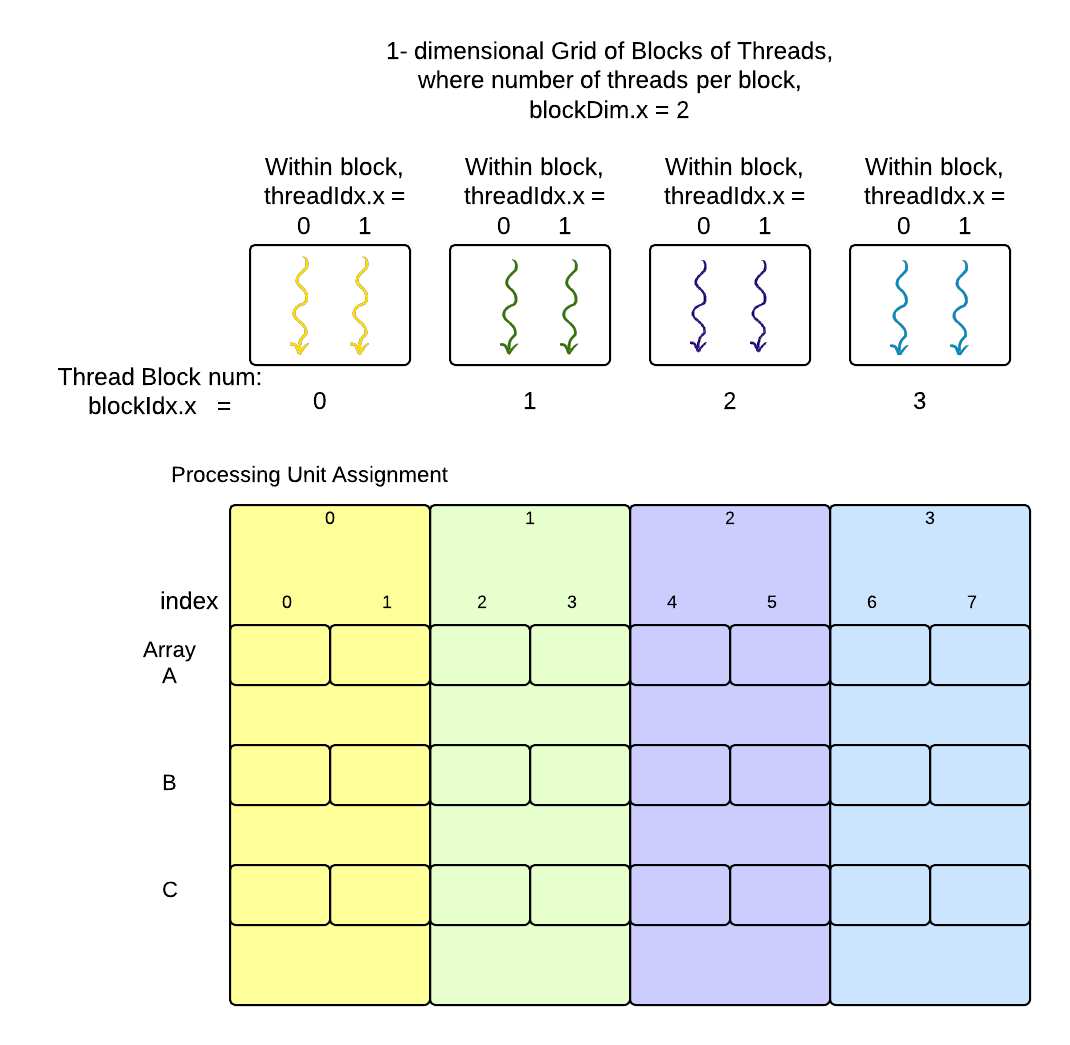
In this case of 1-dimensional arrays whose elements are being added, it is intuative to use a 1-dimensional grid of blocks, each of which has a 1-dimensional set of threads within it. For more complicated data, CUDA does let us define two or three-dimensional groupings of blocks and threads, but we will concentrate one this 1-dimensional example here. In this case, we will use the ‘x’ dimension provided by CUDA variables (the ‘y’ and ‘z’ dimensions are available for the complex cases when our data would naturally map to them). The three variables that we can access in CUDA code for this example shown above are:
- threadIdx.x represents a thread’s index along the x dimension within the block.
- blockIdx.x represents a thread’s block’s index along the x dimension within the grid.
- blockDim.x represents the number of threads per block in the x direction.
In our simple example, there are a total of eight threads executing, each one numbered from 0 through 7. Each thread executing code on the GPU can determine which thread it is by using the above variables like this:
int tid = blockDim.x * blockIdx.x + threadIdx.x;
| [1] | Each GPU, depending on what type it is, can run a certain number of CUDA blocks containing some number of threads concurrently. Your code can define the number of blocks and the number of threads per block, and the hardware will run as many as possible concurrently. The maximum number of threads you can declare in a block is 1024, while the number of blocks you can declare is a very large number that depends on your GPU card. Here we show a simple case of four blocks of 2 threads each, which in CUDA terminology forms a grid of blocks. This particular grid of blocks would enable each element in an array of size 8 to be computed concurrently in parallel by 8 CUDA threads. To envision how the decomposition of the work might occur, imagine that the block of yellow threads corresponds to processing unit 0; similarly for each additional block of threads. |
| [2] | This isn’t always the case in OpenMP programs– you can know just what you are and execute a section of code accordingly. |
The Host and the Device
CUDA programs execute code on a GPU, which is a co-processor, because it is a device on a card that is separate from the motherboard holding the CPU, or central processing unit. In CUDA programming, the primary motherboard with the CPU is referred to as the host and the GPU co-processor is usually called the device. The GPU device has separate memory and different circuitry for executing instructions. Code to be executed on the GPU must be compiled for its instrution set.
CUDA Code for Vector Add
The overall structure of a CUDA program that uses the GPU for computation is as follows:
Define the the code that will run on the device in a separate function, called the kernel function.
- In the main program running on the host’s CPU:
- allocate memory on the host for the data arrays.
- initialze the data arrays in the host’s memory.
- allocate separate memory on the GPU device for the data arrays.
- copy data arrays from the host memory to the GPU device memory.
On the GPU device, execute the kernel function that computes new data values given the original arrays. Specify how many blocks and threads per block to use for this computation.
After the kernel function completes, copy the computed values from the GPU device memory back to the host’s memory.
Here is the actual code example for 8-element vector addition, with these above steps numbered. This is in the file VectorAdd/CUDA/VA-GPU-simple.cu in the compressed tar file of examples that accompanies this reading.
1 2 3 4 5 6 7 8 9 10 11 12 13 14 15 16 17 18 19 20 21 22 23 24 25 26 27 28 29 30 31 32 33 34 35 36 37 38 39 40 41 42 43 44 45 46 47 48 49 50 51 52 53 54 55 56 57 58 59 60 61 62 63 64 65 66 67 68 69 70 71 72 73 74 75 76 77 78 79 80 81 82 83 84 85 86 87 88 89 90 91 92 93 94 95 96 97 98 99 100 101 102 103 104 105 106 107 108 109 110 111 112 113 | /*
* A simplified example of vector addition in CUDA to illustrate the
* data decomposition pattern using blocks of threads.
*
* To compile:
* nvcc -o va-GPU-simple VA-GPU-simple.cu
*/
#include <stdio.h>
// In this example we use a very small number of blocks
// and threads in those blocks for illustration
// on a very small array
#define N 8
#define numThread 2 // 2 threads in a block
#define numBlock 4 // 4 blocks
/*
* 1.
* The 'kernel' function that will be executed on the GPU device hardware.
 */
__global__ void add( int *a, int *b, int *c ) {
// the initial index that this thread will work on
int tid = blockDim.x * blockIdx.x + threadIdx.x;
// In this above example code, we assume a linear set of blocks of threads in the 'x' dimension,
// which is declared in main below when we run this function.
// The actual computation is being done by individual threads
// in each of the blocks.
// e.g. we use 4 blocks and 2 threads per block (8 threads will run in parallel)
// and our total array size N is 8
// the thread whose threadIdx.x is 0 within block 0 will compute c[0],
// because tid = (2 * 0) + 0
// the thread whose threadIdx.x is 0 within block 1 will compute c[2],
// because tid = (2 * 1) + 0
// the thread whose threadIdx.x is 1 within block 1 will compute c[3],
// because tid = (2 * 1) + 1
//
// The following while loop will execute once for this simple example:
// c[0] through c[7] will be computed concurrently
//
while (tid < N) {
c[tid] = a[tid] + b[tid]; // The actual computation done by the thread
tid += blockDim.x; // Increment this thread's index by the number of threads per block:
// in this small case, each thread would then have a tid > N
}
}
/*
* The main program that directs the execution of vector add on the GPU
*/
int main( void ) {
int *a, *b, *c; // The arrays on the host CPU machine
int *dev_a, *dev_b, *dev_c; // The arrays for the GPU device
// 2.a allocate the memory on the CPU
a = (int*)malloc( N * sizeof(int) );
b = (int*)malloc( N * sizeof(int) );
c = (int*)malloc( N * sizeof(int) );
// 2.b. fill the arrays 'a' and 'b' on the CPU with dummy values
for (int i=0; i<N; i++) {
a[i] = i;
b[i] = i;
}
// 2.c. allocate the memory on the GPU
cudaMalloc( (void**)&dev_a, N * sizeof(int) );
cudaMalloc( (void**)&dev_b, N * sizeof(int) );
cudaMalloc( (void**)&dev_c, N * sizeof(int) );
// 2.d. copy the arrays 'a' and 'b' to the GPU
cudaMemcpy( dev_a, a, N * sizeof(int),
cudaMemcpyHostToDevice );
cudaMemcpy( dev_b, b, N * sizeof(int),
cudaMemcpyHostToDevice );
// 3. Execute the vector addition 'kernel function' on th GPU device,
    // declaring how many blocks and how many threads per block to use.
    add<<<numBlock,numThread>>>( dev_a, dev_b, dev_c );
// 4. copy the array 'c' back from the GPU to the CPU
cudaMemcpy( c, dev_c, N * sizeof(int),
cudaMemcpyDeviceToHost );
// verify that the GPU did the work we requested
bool success = true;
int total=0;
printf("Checking %d values in the array.\n", N);
for (int i=0; i<N; i++) {
if ((a[i] + b[i]) != c[i]) {
printf( "Error: %d + %d != %d\n", a[i], b[i], c[i] );
success = false;
}
total += 1;
}
if (success) printf( "We did it, %d values correct!\n", total );
// free the memory we allocated on the CPU
free( a );
free( b );
free( c );
// free the memory we allocated on the GPU
cudaFree( dev_a );
cudaFree( dev_b );
cudaFree( dev_c );
return 0;
}
|
CUDA development and Special CUDA Syntax
The CUDA compiler is called nvcc. This will exist on your machine if you have installed the CUDA development toolkit.
The code that is to be compiled by nvcc for execution on the GPU is indicated by using the keyword __global__ in front of the kernel function name in its definition, like this on line 21:
*/
__global__ void add( int *a, int *b, int *c ) {
The invocation of this kernel function on the GPU is done like this in the host code on line 82:
// declaring how many blocks and how many threads per block to use.
add<<<numBlock,numThread>>>( dev_a, dev_b, dev_c );
Note how you set the number of blocks and the number of threads per block to use with the <<< >>> syntax.
Larger Problems
There is an additional file in the tar archive supplied for this reading that is called VectorAdd/CUDA/VA-GPU-larger.cu. You could experiment with larger arrarys in this version of the code. Comments within it explain how the thread assignment to array elements works if your array is larger than the number of total threads you use. CUDA and GPUs are better suited to much larger problems than we have shown for illustration here.